Complete Guide to Image Compression
Learn how to reduce image file sizes without losing quality. Covers lossy vs lossless compression, best tools, and optimization tips.
Image compression is one of the most effective performance improvements you can make to a website. A single unoptimized photo can add hundreds of kilobytes to a page, slow down loading on mobile connections, and increase bandwidth costs. This guide explains how image compression works, when to use lossy or lossless compression, and how to produce consistently good results with PictKit.
Why Image Compression Matters
Images usually make up most of a webpage's total weight. Reducing image file size has three practical benefits:
- Faster pages: smaller files download more quickly, especially on mobile networks.
- Lower bandwidth costs: less data is transferred to every visitor.
- Better user experience: pages appear faster and consume less data on limited plans.
Compression is not about "making images worse." It is about removing unnecessary data while keeping the visible result close to the original.
Lossy vs. Lossless Compression
The two main approaches to compression solve different problems.
| Approach | How it works | Best for | Typical savings |
|---|---|---|---|
| Lossy | Removes visual details that are hard to notice, then re-encodes the image | Photos, website imagery, social media | 50-90% |
| Lossless | Rewrites the data more efficiently without discarding pixels | Screenshots, logos, line art, PNG assets | 5-30% |
Lossy formats such as JPEG, WebP, and AVIF use perceptual models to discard high-frequency detail. When applied carefully, the difference is difficult to detect on normal screens. Lossless compression is safer for images with sharp edges, text, or transparency, where every pixel matters.
What Happens Inside a Compression Tool
Modern image codecs do not simply "delete pixels." They transform the image into frequency data, remove or simplify less noticeable information, and then encode the remaining data efficiently. WebP and AVIF improve on older formats by using better prediction and coding techniques, which is why they can deliver comparable quality at a much smaller size.
For most use cases, you do not need to understand the mathematical details. You need a workflow that lets you compare the original and the compressed result before downloading.
How to Compress Images with PictKit
- Open the image compression tool or upload images directly.
- Drag and drop one or more JPG, PNG, or WebP files into the upload area.
- Choose a compression mode:
- Balanced: a good default for photos and website images.
- Best Quality: keeps more visual detail when file size matters less.
- Maximum: produces the smallest file, suitable for previews or thumbnails.
- Target Size: lets you enter an exact output size in KB.
- If you also need a smaller resolution, set a new width in the dimensions panel.
- Use the comparison slider to inspect edges, text, and gradients.
- Download the result or export all processed images as a ZIP.
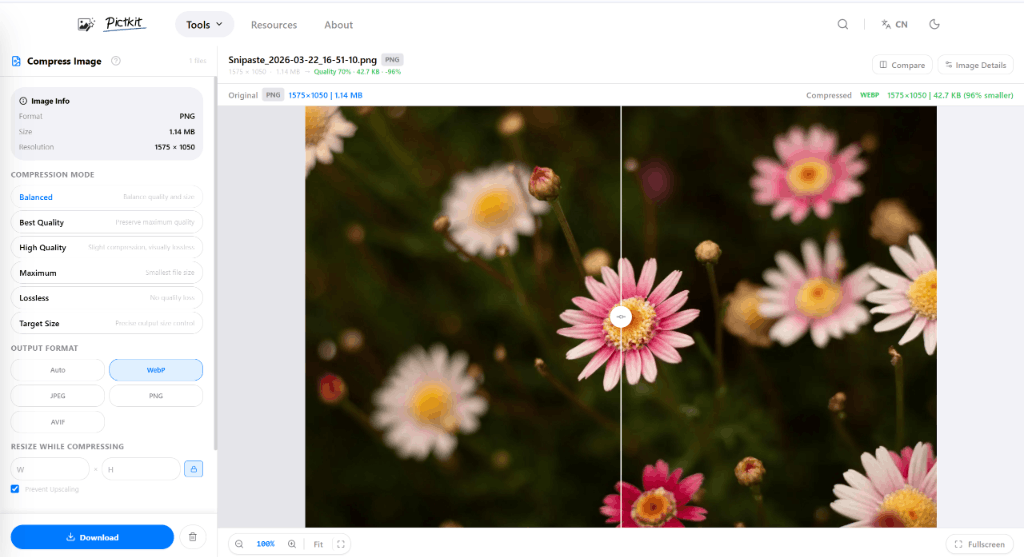
The comparison slider is important because it shows exactly what was changed. A good compression setting should look nearly identical at normal viewing size while removing a large percentage of the file.
Best Practices by Use Case
Website Photography
Use WebP or AVIF when browser support allows. Start with quality 75-85 and inspect the result. If the image contains fine textures, test a slightly higher quality setting.
Social Media and Sharing
Most platforms re-encode images again after upload. Compress enough to make the file easy to upload, but keep quality high enough for the platform's target resolution. JPEG or WebP at quality 80-90 is usually a safe choice.
Logos and Screenshots
Use lossless PNG or SVG for logos and screenshots with text. Lossy compression can introduce visible noise around text and sharp edges. For screenshots that only need to be shared once, PNG lossless is often the simplest option.
Bulk Processing
When processing dozens of images, apply the same settings first, then inspect a sample of results. Batch compression is most efficient when the source images are similar in type and resolution.
Common Compression Mistakes
- Compressing already compressed images: re-encoding a low-quality JPEG adds artifacts. Use the original file whenever possible.
- Using lossless for photos: photos rarely benefit enough from lossless compression to justify the larger file size.
- Ignoring resolution: a 6000-pixel-wide photo used in a 1200-pixel-wide layout wastes bandwidth. Resize before compressing.
- Skipping visual inspection: file size alone is not a quality metric. Always compare the result.
FAQ
What is the best format for compression? WebP is a strong all-around choice for photos and graphics on modern browsers. AVIF often produces even smaller files, but support and encoding time can vary. JPEG remains useful for maximum compatibility.
Can I compress without losing any pixels? Yes, using lossless PNG or lossless WebP. The tradeoff is that savings are much smaller than lossy compression.
Why is my compressed image still large? The original may already be highly optimized, or the image may contain complex textures that do not compress well. Reducing resolution usually has a bigger impact.
Does PictKit upload my images? No. All processing happens locally in the browser, and the original files are not sent to a server.